An example of non integer scaling of pixel art.
Overview
Pixel art is living a beautiful renaissance these last years, with more and more studios embracing its visuals and more artists going back to this unique way of describing visuals in a game.
One of the most annoying problem we are seeing, especially since we don’t have all the CRT TVs that ‘apply their filters’, is the pixel ‘shimmering’ happening when scaling or moving a pixel art image with non-integer values.
This article aims to be a light introduction to the problem and more a practical testbed to experiment with filtering. I found that just using Shadertoy was not enough, and I would like to give programmers a more advanced testbed that they can modify to improve their games!
Summary/TLDR
First of all we will state what is the problem we are trying to solve, even though enough posts already talked about that. There is an intuition that is at the base of all the filters, so it is important to have that in mind.
Then we will go through each filter I found around, with a simple explanation and link to the original article and code. Hopefully it will be easy to follow!
Finally some informations about the included source code, so you can experiment with Pixel Art Filtering.
Enjoy!
The Problem
What we are trying to fix is to find the relationship between pixel on the screen and pixel of the texture, or texels, to perceptually preserve the original texture appearance.
One key component here is that we want to apply any kind of transform to the sprite/mesh that will use this texture and still preserve the texture appearance. Something that can be done withouth further venturing into this realm is to use both integer-only camera movement increments, and scale to only integer number. This works only for sprite based games, and it can suffice if you don’t add any zoom or rotation to the game. Many indie games, that are beautifully 2D and sprite based, can simply do that if no zoom (thus scaling) or rotation is applied.
But if you are wanting to add something more dynamic then it can become a problem!
Examples: Samurai Showdown and Children of Morta
Already back in the day scaling and rotation were a problem, and artifacts were visible. I can think of Samurai Showdown games when zooming out the camera, and in the quick action of the game, despite the purposely quick zoom, you can see pixel shimmering around.
A more recent example, that received a lot of attention from Handmade Hero, is Children of Morta (very nice game, go and play it if you haven’t!).
Disclaimer: it is not my intention to talk bad about the game, just to show an example that already suffered for this problem, and maybe, at the end of the article, have a testbed to try different solutions!
As you can see also from videos of the game, zooming out (especially done with a slow speed) show the pixel shimmering that causes the problem.
For some (unknown to me) reason, some shaders use the term ‘Fat Pixel’ to refer to this problem, and it will help you finding some solutions on Shadertoy as well!
Pixels and Texels (and Fat Pixels)
To simplify the problem, we will look at sprite based games, so no 3D rotations, but the solution can be generalized to 3D as well.
I found this article to have the easiest explanation of the problem we are trying to solve, but I will restate it so it is clear visually inside this article as well.
The appearance we want to preserve is the one of a Pixel Art texture, so we want pixel of the texture, that we will call Texels to be distinguishable from each other. We thus need to apply some sort of filtering to the texture when rendering it on the screen.
Let’s see a simple case: an integer scale:
2X Scale.
Here is clear that the pixels will be 1 to 1 with the texels, thus maintaining the pixel art visuals.
NOTE: using bilinear will add blurriness at the edges though, so normally integer scaling and translation need a neighbour/nearest filter.
And now let’s see a non integer scale with some translation applied as well:
1.5X Scale and Translation.
The situation is worst. Some pixels are full while some others are edges. I tried to highlight the original texture (a simple quad) with grey outline and color the pixels in the fully filled pixels.
We see that only 4 pixels are fully colored, the others all need some sort of filter for the edges.
Finally, some scale and rotation as well:
1.5X Scale, Translation and Rotation.
This is the most difficult situation. Only 3 pixels are full and everything else needs a proper edge management.
It is clear (I hope!) that using only bilinear filter is not enough: the fact that each pixel can always take up 4 samples smudges everything, and we lose exactly what we want: sharp pixel art!
Same for neighbour/nearest: on fully contained pixels-in-texels it works, but on edges it is straight wrong. This causes non-square texels to fill the image.
We need a combination of both!
The Intuition
The idea behind the filtering is simple: apply neighbour/nearest filter on pixels that are fully inside a texel, and use bilinear with custom weights at the edges!
This is what is all about.
The tricky part is to come out with some custom weights for the bilinear filter to work out, and that is why there are so many different filters.
We will now see the different filters included in the testbed. Nothing that I wrote, so I will include links to the original material and you can see the awesomeness of the authors!
The Filters
Here we analyze the different filters proposed and separate their code. All the shaders are into the DataDrivenRendering/data/articles/PixelArtFiltering/pixel_art_filtering.hfx file.
NOTE!: textures are sampled with Bilinear filtering and Alpha Blending is enabled, so that edges can be smoother. This is very important for the final results!
All the filters will give back a modified UV that will leverage the bilinear sampling.
Nearest
Even though is not a part of the ‘solution’, it is interesting to see how we can obtain manually the nearest filter coordinates, despite having enabled bilinear filtering.
Taken directly from the OpenGL Specification (page 281):
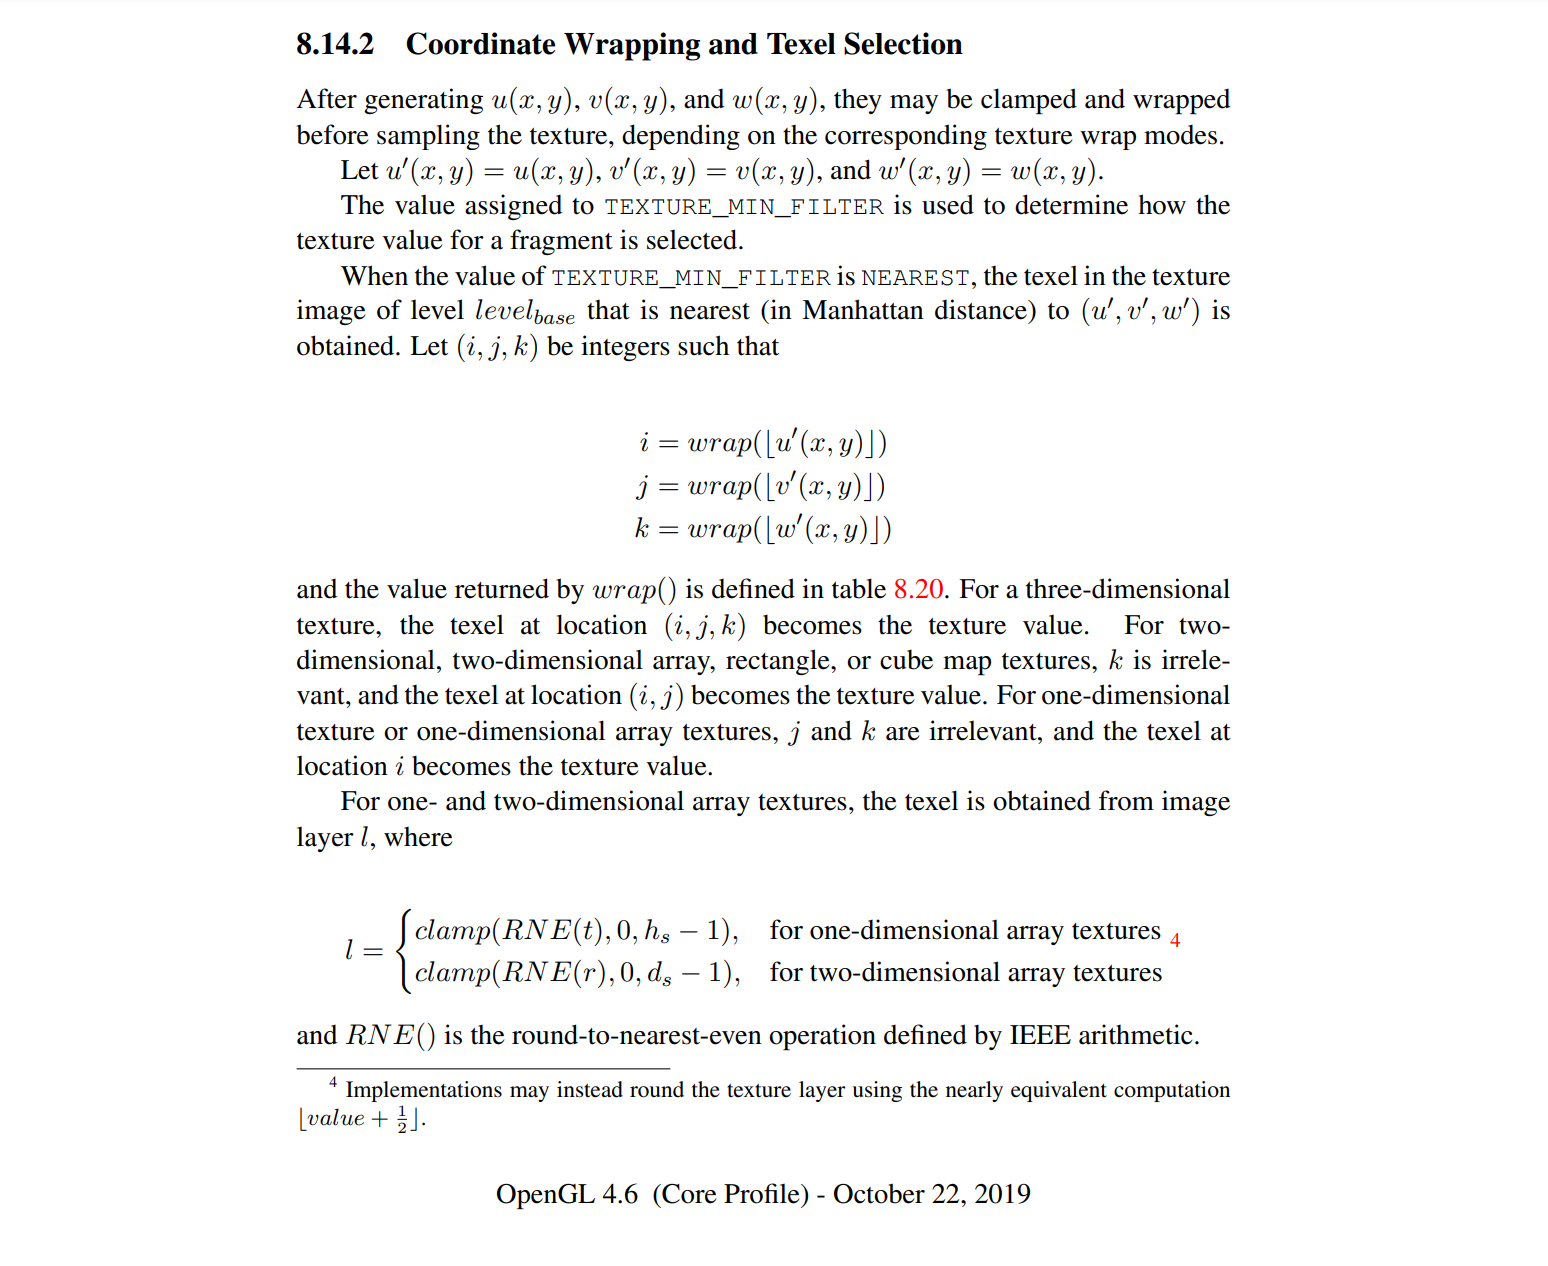
OpenGL nearest formula.
In the footer, the idea we are using is explained:
Implementations may instead round the texture layer using the nearly equivalent computation |value + 1/2|.
We need to search the Manhattan distance from the texel center, thus using floor(pixel) + 0.5 works perfectly.
vec2 uv_nearest( vec2 uv, ivec2 texture_size ) {
    vec2 pixel = uv * texture_size;
    pixel = floor(pixel) + .5;

    return pixel / texture_size;
}
CSantos
Claudio Santos (github) in his blog already in 2014 tackled the problem, as we can see from the following blog posts:
- manual-texture-filtering-for-pixelated-games-in-webgl
- automatically-detecting-the-texture-filter-threshold-for-pixelated-magnifications
He was searching for a way to modify the UV closer to the texel seam, and came up with his own way.
In order to have smooth transitions between texels, this offset should be replaced by a function that increases linearly at the margin of the texel, remains constant at its “blocky” region (with a value of 0.5) and then increases to 1.0 on the opposite margin of the texel.
He mathematically found the 2 functions to add close to the ‘minimum’ seam (towards the 0 of the texel) and towards the ‘maximum’ seam (towards 1):
- clamp( .5 / alpha * pixels_fract, 0, .5 )
- clamp( .5 / alpha * (pixels_fract - 1) + .5, 0, .5 )
In the second blog post, he found also that using fwidth on the texel coordinates give you a resolution independent value that can be used to have a more consistent look:
vec2 uv_cstantos( vec2 uv, vec2 res ) {
    vec2 pixels = uv * res;

    // Updated to the final article
    vec2 alpha = 0.7 * fwidth(pixels);
    vec2 pixels_fract = fract(pixels);
    vec2 pixels_diff = clamp( .5 / alpha * pixels_fract, 0, .5 ) +
                       clamp( .5 / alpha * (pixels_fract - 1) + .5, 0, .5 );
    pixels = floor(pixels) + pixels_diff;
    return pixels / res;
}
We will see in many other filters that the usage of fwidth is crucial to work with resolution independent filtering.
For more informations on fwidth:
- https://www.khronos.org/registry/OpenGL-Refpages/gl4/html/fwidth.xhtml
- https://computergraphics.stackexchange.com/questions/61/what-is-fwidth-and-how-does-it-work
- https://www.ronja-tutorials.com/post/046-fwidth/
Cole Cecil
In a similar way, Cole Cecil in this article creates two different functions that define the steepness of the function that interpolation amount.
vec2 uv_colececil( vec2 uv, ivec2 texture_size ) {
    vec2 pixel = uv * texture_size;

    vec2 locationWithinTexel = fract(pixel);
    // Calculate the inverse of texels_per_pixel so we multiply here instead of dividing.
    vec2 interpolationAmount = clamp(locationWithinTexel * locals.texels_per_pixel, 0, .5) +
                               clamp((locationWithinTexel - 1) * locals.texels_per_pixel + .5, 0, .5);

    return (floor(pixel) + interpolationAmount) / texture_size;
}
The ‘texels_per_pixel’ variable is calculated on the CPU, and it is basically a ratio between the camera render target size and the screen size, including the possible zoom of it.
In the original post from the author it can be found in the comment section.
I write it down here as reference:
static f32 calculate_texels_per_pixel( f32 camera_width, f32 camera_height, f32 camera_zoom, f32 screen_width, f32 screen_height ) {
    f32 texels_per_pixel = 1.f;

    const f32 camera_aspect_ratio = camera_width / camera_height;
    const f32 screen_aspect_ratio = screen_width / screen_height;

    if ( screen_aspect_ratio > camera_aspect_ratio ) {
        texels_per_pixel = camera_height / screen_height;
    }
    else {
        texels_per_pixel = camera_width / screen_width;
    }
    // Zoom is inverted compared to ColeCecil post, so we keep same calculation here but in the shader we multiply.
    return texels_per_pixel / camera_zoom;
}
RNavega
The last filter accompained by a blog post of some sort is from Rodrigo Navega, in the Love2D forum and the shader code.
After the previous filters the mindset is similar, so showing the code should be simpler. We are still calculating the weights based on the distance from the edge, the difference here is that it outputs also an alpha value to be used in conjunction with the texture alpha.
// The default size, in pixels, of the antialiasing filter. The default is 1.0 for a mathematically perfect
// antialias. But if you want, you can increase this to 1.5, 2.0, 3.0 and such to force a bigger antialias zone
// than normal, using more screen pixels.

float SMOOTH_SIZE = locals.filter_width;
float _HALF_SMOOTH = SMOOTH_SIZE / 2.0;

vec2 uv_aa_dist( vec2 uv, vec2 res, out float alpha ) {

    vec2 pixels = uv * res;

    const vec2 nearest_edge = floor( pixels + 0.5 );
    const vec2 edge_distance = (pixels - nearest_edge) * locals.camera_scale;
    const vec2 factor = clamp( edge_distance / vec2(_HALF_SMOOTH), -1.0, 1.0 );

    pixels = (nearest_edge + 0.5 * factor );

    const vec2 center_offset = abs(uv - vec2(0.5));
    vec2 alpha_distance = ((center_offset - 0.5) * res * locals.camera_scale + _HALF_SMOOTH) / SMOOTH_SIZE;
    alpha_distance = clamp( alpha_distance, 0, 1 );
    alpha = 1.0 - max(alpha_distance.x, alpha_distance.y);

    return pixels / res;
}
Remembering that we are using alpha blending as well, we can use this value to output a smoother edge. Also to note that the smooth size can be driven by the filter width in the demo, to experiment with the visuals.
Here the factor is calculated based on the edge distance from the center texel and clamped between -1 and 1.
Klems
Klems decide to use a smoothstep based approach in the shader:
vec2 uv_klems( vec2 uv, ivec2 texture_size ) {

    vec2 pixels = uv * texture_size + 0.5;

    // tweak fractional value of the texture coordinate
    vec2 fl = floor(pixels);
    vec2 fr = fract(pixels);
    vec2 aa = fwidth(pixels) * 0.75;

    fr = smoothstep( vec2(0.5) - aa, vec2(0.5) + aa, fr);

    return (fl + fr - 0.5) / texture_size;
}
It again use fwidth approach to calculate the factor, and use the fractional value to smoothstep between the 2 values that will be used near the edges.
Inigo Quilez (<3)
From the comments in the Klems filter, the incredible Inigo comes up with another filter:
vec2 uv_iq( vec2 uv, ivec2 texture_size ) {
    vec2 pixel = uv * texture_size;

    vec2 seam = floor(pixel + 0.5);
    vec2 dudv = fwidth(pixel);
    pixel = seam + clamp( (pixel - seam) / dudv, -0.5, 0.5);

    return pixel / texture_size;
}
The variable names are quite explicit, but the idea is to again start from the seam of the texture and modify the final uv based on the distance from the seam.
Blocky
This is very similar to IQ filter, just using different math:
// https://www.shadertoy.com/view/ltfXWS
// samples from a linearly-interpolated texture to produce an appearance similar to
// nearest-neighbor interpolation, but with resolution-dependent antialiasing
//
// this function's interface is exactly the same as texture's, aside from the 'res'
// parameter, which represents the resolution of the texture 'tex'.
// basically calculates the lengths of (a.x, b.x) and (a.y, b.y) at the same time
vec2 v2len(in vec2 a, in vec2 b) {
    return sqrt( a * a + b * b );
}

vec2 uv_blocky( in vec2 uv, in ivec2 res ) {
    vec2 pixels = uv * res; // enter texel coordinate space.

    vec2 seam = floor(pixels + .5); // find the nearest seam between texels.

    // here's where the magic happens. scale up the distance to the seam so that all
    // interpolation happens in a one-pixel-wide space.
    pixels = (pixels - seam) / v2len(dFdx(pixels), dFdy(pixels)) + seam;

    pixels = clamp(pixels, seam - .5, seam + .5); // clamp to the center of a texel.

    return pixels / res;// convert back to 0..1 coordinate space.
}
BGolus: Anti-Aliasing
Ben Golus also wrote his own implementation here with two variations as well!
vec2 uv_aa_linear( vec2 uv, vec2 res, float width ) {
    vec2 pixels = uv * res;

    vec2 pixels_floor = floor(pixels + 0.5);
    vec2 pixels_fract = clamp( (pixels - pixels_floor) / fwidth(pixels) / width, -0.5, 0.5);

    return (pixels_floor + pixel_fract) / res;
}

vec2 uv_aa_smoothstep( vec2 uv, vec2 res, float width ) {
    vec2 pixels = uv * res;

    vec2 pixels_floor = floor(pixels + 0.5);
    vec2 pixels_fract = fract(pixels + 0.5);
    vec2 pixels_aa = fwidth(pixels) * width * 0.5;
    pixels_fract = smoothstep( vec2(0.5) - pixels_aa, vec2(0.5) + pixels_aa, pixels_fract );

    return (pixels_floor + pixels_fract - 0.5) / res;
}
They both use a width to define how big is the area covered by the anti-aliasing on the edges, and in the demo it is a tweakable value (default to 1.5).
The first variation it scales using fwidth but also modifies the value with the width, giving the possibility of a more fine tuned control over the edge appearance (pixels - pixels_floor) / fwidth(pixels) / width. This is a unique feature of his filters!
The second variation has both the smoothstep as a way of filtering the UV based on the distance from the center of the texel, and a fwidth tunable with the width again as value to move the sampling coordinate. Note that if width is 0, pixel_fract is 0.5, thus being the center of the texel, and in the final conversion back it is taken in consideration.
Fat Pixel
This is the shader that was mentioned by Casey Muratori in his video and for me started all this research culminating in this article! The original source code is here but again I post the code straight away:
vec2 uv_fat_pixel( vec2 uv, ivec2 texture_size ) {
    vec2 pixel = uv * texture_size;

    vec2 fat_pixel = floor(pixel) + 0.5;
    // subpixel aa algorithm (COMMENT OUT TO COMPARE WITH POINT SAMPLING)
    fat_pixel += 1 - clamp((1.0 - fract(pixel)) * locals.texels_per_pixel, 0, 1);

    return fat_pixel / texture_size;
}
Using the same texels_per_pixel number calculated as for the Cole Cecil shader, we basically move the UV based on the distance to the edge.
Note that texels_per_pixel if camera and scene have the same size it becomes just the camera zoom - so we are choosing the weight from edge scaled by the zoom factor of the camera.
TODO: The Maister
There is a final filter that I wanted to check, but I will come at it later. I wanted to write about it briefly because there is the most mathematical approach and thus can shed some light also an all the other filters!
The most mathematical approach is by Hans Kristian in which he does an analysis of the problem from a signal theory point of view. His blog is full of great posts, so go check it out!
The posts that we will see are the following:
- pseudo-bandlimited-pixel-art-filtering-in-3d-a-mathematical-derivation
- why-coverage-based-pixel-art-filtering-is-terrible
They are an in-depth signal based analysis of the problem, even though the author kindly added source code as well.
I will check the shader code in the future, for now the blog post is what really gives a hand at understanding the other filters.
The Testbed
With the accompanying source code there is included also some graphics to already test the idea presented here. I’ve used two textures, that were free to use made available by the amazing Luis Zuno found through his itch.io page.
It should be pretty straightforward to modify the shaders and test your own ideas, so I hope you will come up with new filters!
All the filters are in DataDrivenRendering/data/articles/PixelArtFiltering/pixel_art_filtering.hfx file.
The source is in my github repository both in data/articles/PixelArtfiltering and source/articles/PixelArtFiltering where you can find the shaders and the code. There are basically only two files (pixel_art_filtering.hfx and pixel_art_filtering_app.cpp) that you need to modify to experiment with this concepts.
Scene Setup
The scene is composed of an animated sprite and a background.
There are different options to zoom in and out and translate, to test all possible scenarios.
I’ve added also a simple CRT filter to be toggled after the scene is rendered.
Also, sampling is always bilinear.
You can also toggle premultiplied alpha, so you see that not having any alpha blending will result in shimmering edges, another big problem not really mentioned around.
Links and Previous Work
Here I want to link all the previous posts about the subject for quick reference:
- https://csantosbh.wordpress.com/2014/01/25/manual-texture-filtering-for-pixelated-games-in-webgl/
- https://csantosbh.wordpress.com/2014/02/05/automatically-detecting-the-texture-filter-threshold-for-pixelated-magnifications/
- https://colececil.io/blog/2017/scaling-pixel-art-without-destroying-it/
- https://themaister.net/blog/2018/08/25/pseudo-bandlimited-pixel-art-filtering-in-3d-a-mathematical-derivation/
- https://love2d.org/forums/viewtopic.php?t=89442
- https://github.com/RNavega/PixelArt-Antialias-Love2D/blob/master/main.lua
Also ShaderToy is a source of many other filters included in the demo.
- https://www.shadertoy.com/view/MllBWf
- https://www.shadertoy.com/view/ltfXWS
- https://www.shadertoy.com/view/4dlXzB
- https://www.shadertoy.com/view/ltcGDX
- https://www.shadertoy.com/view/ltBGWc
- https://www.shadertoy.com/view/ltBfRD
Conclusions
We saw different sampling filters that resulted in different ways of leveraging the bilinear filtering with some custom coordinates to obtain a mix of sharpness for inside pixels and smoothness on the edges.
We also have now a easy to modify testbed to try different ideas and hopefully make your pixels (and your eyes) happy!
As always, please comment, modify, improve, share the article and the code!