Overview
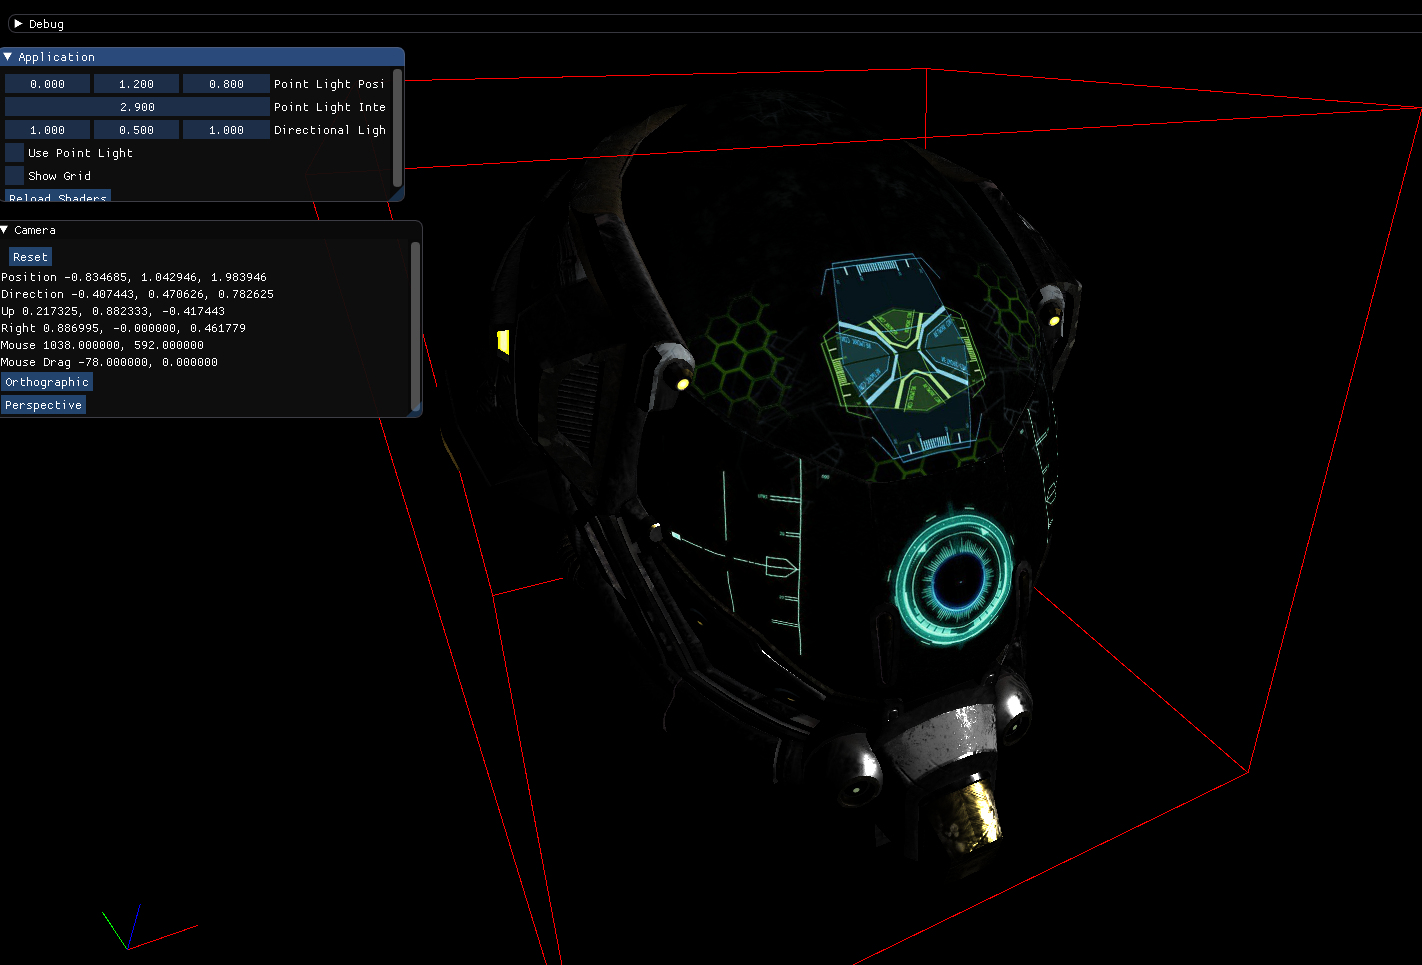
Model used in the demo.
Data Driven Rendering Series:
- https://jorenjoestar.github.io/post/writing_shader_effect_language_1/
- https://jorenjoestar.github.io/post/writing_shader_effect_language_2/
- https://jorenjoestar.github.io/post/writing_shader_effect_language_3/
- https://jorenjoestar.github.io/post/data_driven_rendering_pipeline/
We finally arrived in the Rendering Pipeline realm. Some can write that it is useless, some can hate it. Many have some sort of abstraction for it since ages, and others have to now that new APIs like Vulkan and DX12 have it as an explicit part of their design (finally!).
After we built a basic Material System in the previous article (https://jorenjoestar.github.io/post/writing_shader_effect_language_3/) we can add another layer on top of it and built a complete Rendering Frame.
In this article I will talk about a simplified version of Render Graph that I call Render Pipeline and came into my mind in the canteen of Codemasters after thinking:
What is the biggest dependency in Rendering ?
The answer is simple:
Render Targets!
Render Targets or Frame Buffers is just an intermediate buffer in which we can draw something and use it later. Basically a Read/Write texture! It is not easy to shuffle around a Render Target, and having knowledge of which one are you using can make a huge difference for your rendering tech. Textures and Render Targets are the biggest memory lord in any rendering application, thus knowing where you are spending your memory can be really powerful.
From a pure understanding of rendering techniques, having a clear visualization of this aspect makes a HUGE difference!
Once I started using to describe a frame of rendering with the Render Target Dependencies I never looked back. As always, knowledge is power.
Render Pipeline Thinking
First of all, let’s start defining some general concepts to describe the problem we are trying to solve.
The problem we are trying to solve is:
How to describe the inter-frame dependencies of Render Targets in a frame ?
The dependencies are who writes and/or read from/to a Render Target. That is exactly what is described in a Render Pipeline. Enter the Render Pipeline.
A Render Pipeline is a list of Passes that read and writes Render Targets.
That’s it. Done! See you next article!
Of course I am kidding - but this is the gist of it. The implications, however, are profound.
Next logical question is:
How can we read and write from/to a Render Target ?
Let’s list how we can write to a Render Target
- Graphics - binding some geometry, render states and Render Targets
- Compute - write anything to the Render Target
Even a so called ‘post-process’ is just a fullscreen triangle with a shader.
And to read…well any shader that takes reads a texture!
It is incredible to think that with this simple building blocks you can describe almost everything to render!
For example, let’s try to express some common rendering techniques using only those concepts.
Deferred Rendering
We can define the following simple steps:
- Meshes uses their materials (shaders + textures + constants) as input and write into GBuffer Render Target + depth.
- A Compute/Post-process shader will read the Gbuffer Render Target and depth (to reconstruct the pixel position), a light list of some sort and outputs a texture with the result.
- Transparent objects are drawn into this new Render Target using their materials.
- And so on…
Exponential Variance Shadow Mapping in a Forward Rendering Pipeline
- Meshes writes into a depth-only render target using the light as ‘camera/point of view’.
- Compute or Postprocess converts the depth-only render target into a EVSM one.
- Meshes uses their materials and the EVSM shadow map to render into a ‘main’ Render Target.
<diagram 2 goes here>
Other Rendering Concepts
To give a full description of the frame we need to add other concepts that will help us. These are the less strict ones - and just a personal way of seeing things.
Render View
The concept of ‘Render View’ is just a way or representing a camera and a list of visible objects from it. We will see how we use it later, but a simple example of Render View would be the ‘Sun Shadow’ render view - representing the sun (as a camera) and a list of visible objects from it. The ‘Main’ render view of course represent the main camera and visible objects. This, combined with render managers becomes a powerful combination to describe what needs to be rendered.
Render Manager
If you think from an ECS mentality, this would be a ‘system’. Each render manager is responsible to render one or more render ‘aspects/entities’ into a Render Pass. A render manager can subscribe to any ‘graphics’ pass and render from there.
For example, a ‘static geometry’ render manager could setup an instancing buffer for the gbuffer-generation pass and draw all objects.
Render Pipeline Implementation
After we defined the basic concepts let’s see an actual implementation of the Render Pipeline. We will see the code of each component and arrive at the actual data definition (in json).
The code has changed a bit since last article, with the inclusion of CGLM as math library and other high-level rendering code, included in hydra_rendering.h/.cpp.
Render View
First element is the Render View:
//
// Render view is a 'contextualized' camera - a way of using the camera in the render pipeline.
//
struct RenderView {

    Camera                          camera;

    array( RenderScene )            visible_render_scenes;

}; // struct RenderView
Using STB’s array (the macro is just an aid to know it is not just a pointer) we have a list of visible render scenes from that camera. It should be pretty straighforward.
Render Manager
Next is Render Manager:
//
struct RenderManager {

    struct RenderContext {
        Device*                     device;

        const RenderView*           render_view;
        CommandBuffer*              commands;

        RenderScene*                render_scene_array;
        uint16_t                    start;
        uint16_t                    count;

        uint16_t                    stage_index;
    }; // struct RenderContext

    virtual void                    render( RenderContext& render_context ) = 0;

}; // struct RenderManager
The base class is really just a ‘render’ method. Here the RenderContext is interesting, and it gives access to all you need to render:
- Device - used to map/unmap resources.
- RenderView - access to camera (and more, but that’s for the next article!).
- CommandBuffer - the actual draw commands are written here.
- RenderScene - the RenderScene from start to start + count.
In this very simple demo, we have just 2 render managers: Line Renderer and Scene Renderer. The most interesting one is the second: Line Renderer has commands to draw lines that will be mapped into a GPU buffer and uses instancing to draw them.
void LineRenderer::render( RenderContext& render_context ) {

    Device& device = *render_context.device;

    // Update camera matrix
    const Camera& camera = render_context.render_view->camera;

    MapBufferParameters cb_map = { lines_cb, 0, 0 };

    float L = 0, T = 0;
    float R = device.swapchain_width, B = device.swapchain_height;
    const float ortho_projection[4][4] =
    {
        { 2.0f / ( R - L ),   0.0f,         0.0f,   0.0f },
        { 0.0f,         2.0f / ( T - B ),   0.0f,   0.0f },
        { 0.0f,         0.0f,        -1.0f,   0.0f },
        { ( R + L ) / ( L - R ),  ( T + B ) / ( B - T ),  0.0f,   1.0f },
    };

    LocalConstants* cb_data = (LocalConstants*)device.map_buffer( cb_map );
    if ( cb_data ) {
        cb_data->view_projection = camera.view_projection;

        memcpy( &cb_data->projection, &ortho_projection, 64 );

        cb_data->resolution = { device.swapchain_width * 1.0f, device.swapchain_height * 1.0f, 1.0f / device.swapchain_width, 1.0f / device.swapchain_height };
        device.unmap_buffer( cb_map );
    }

    if ( current_line_index ) {
        const uint32_t mapping_size = sizeof( LinVertex ) * current_line_index;
        MapBufferParameters map_parameters_vb = { lines_vb, 0, mapping_size };
        LinVertex* vtx_dst = (LinVertex*)device.map_buffer( map_parameters_vb );

        if ( vtx_dst ) {
            memcpy( vtx_dst, &s_line_buffer[0], mapping_size );

            device.unmap_buffer( map_parameters_vb );
        }

        CommandBuffer* commands = render_context.commands;
        commands->begin_submit( 2 );

        ShaderInstance& shader_instance = line_material->shader_instances[3];
        commands->bind_pipeline( shader_instance.pipeline );
        commands->bind_resource_list( shader_instance.resource_lists, shader_instance.num_resource_lists, nullptr, 0 );
        commands->bind_vertex_buffer( lines_vb, 0, 0 );
        // Draw using instancing and 6 vertices.
        const uint32_t num_vertices = 6;
        commands->draw( TopologyType::Triangle, 0, num_vertices, current_line_index / 2 );
        commands->end_submit();

        current_line_index = 0;
    }
}
Easy to notice how, with a Vulkan/DX12 interface, there are few less commands to write. Binding a pipeline sets everything considered ‘static’ - render states, shaders - and with just resource lists (that sets textures and constants) and vertex/index buffers we have everything needed to render.
NOTE: HFX has gone some improvements and now supports render states and vertex declarations/formats. I’ll write about it in the next post - but this has become crucial.
Shader Resources Management
This is another personal preference - but not necessary at all. Two concepts are really useful to me to be explicit and centralized: resources and bindings.
Resources are all referenced in a ‘Shader Resource Database’:
//
// Struct used to retrieve textures, buffers and samplers.
//
struct ShaderResourcesDatabase {

    struct BufferStringMap {
        char*                       key;
        BufferHandle                value;
    }; // struct BufferStringMap

    struct TextureStringMap {
        char*                       key;
        TextureHandle               value;
    }; // struct TextureStringMap

    struct SamplerStringMap {
        char* key;
        SamplerHandle               value;
    }; // struct SamplerStringMap

    BufferStringMap*                name_to_buffer = nullptr;
    TextureStringMap*               name_to_texture = nullptr;
    SamplerStringMap*               name_to_sampler = nullptr;

    void                            init();
    void                            terminate();

    void                            register_buffer( char* name, BufferHandle buffer );
    void                            register_texture( char* name, TextureHandle texture );
    void                            register_sampler( char* name, SamplerHandle sampler );

    BufferHandle                    find_buffer( char* name );
    TextureHandle                   find_texture( char* name );
    SamplerHandle                   find_sampler( char* name );

}; // struct ShaderResourcesDatabase
Simply put, any resource used by rendering is here. Both Materials, Pipelines and Render Managers register and use the database to create the resource lists used in rendering.
Next and more convoluted is the shader resources lookup class:
//
// Struct to link between a Shader Binding Name and a Resource. Used both in Pipelines and Materials.
//
struct ShaderResourcesLookup {

    enum Specialization {
        Frame, Pass, View, Shader
    }; // enum Specialization

    struct NameMap {
        char*                       key;
        char*                       value;
    }; // struct NameMap

    struct SpecializationMap {
        char*                       key;
        Specialization              value;
    }; // struct SpecializationMap

    NameMap*                        binding_to_resource = nullptr;
    SpecializationMap*              binding_to_specialization = nullptr;
    NameMap*                        binding_to_sampler = nullptr;

    void                            init();
    void                            terminate();

    void                            add_binding_to_resource( char* binding, char* resource );
    void                            add_binding_to_specialization( char* binding, Specialization specialization );
    void                            add_binding_to_sampler( char* binding, char* sampler );

    char*                           find_resource( char* binding );
    Specialization                  find_specialization( char* binding );
    char*                           find_sampler( char* binding );

    void                            specialize( char* pass, char* view, ShaderResourcesLookup& final_lookup );

}; // struct ShaderResourcesLookup
This class specify the binding between a shader resource and an actual resource. As a simple example to clarify, a shader could have an ‘albedo’ texture defined in the code, but the actual texture is defined by the material. Or for a Render Stage, like a Post-Processing one, its input could be defined in the shader code as ‘input 0, input 1…' and the render pipeline creates the binding.
With those in place, we can finalize any resource used by any shader/material/pipeline.
The actual usage is into the Shader Instance class. Let’s have a quick look.
//
struct ShaderInstance {

    void                            load_resources( const PipelineCreation& pipeline, PipelineHandle pipeline_handle, ShaderResourcesDatabase& database, ShaderResourcesLookup& lookup, Device& device );

    PipelineHandle                  pipeline;
    ResourceListHandle              resource_lists[k_max_resource_layouts];

    uint32_t                        num_resource_lists;
}; // struct ShaderInstance
This class is what actually contains the resource lists and pipeline used to render anything. Not very happy with the name - any suggestion welcome. A material contains a list of those - one for each pass - and is used to draw. Again with the new Vulkan/DX12 mentality, Pipeline + Resource Lists + Geometry is all you need to render almost.
The magic happens when creating the resource lists:
void ShaderInstance::load_resources( const PipelineCreation& pipeline_creation, PipelineHandle pipeline_handle, ShaderResourcesDatabase& database, ShaderResourcesLookup& lookup, Device& device ) {

    using namespace hydra::graphics;
    ResourceListCreation::Resource resources_handles[k_max_resources_per_list];

    for ( uint32_t l = 0; l < pipeline_creation.num_active_layouts; ++l ) {
        // Get resource layout description
        ResourceListLayoutDescription layout;
        device.query_resource_list_layout( pipeline_creation.resource_list_layout[l], layout );
We know that a pipeline can have 1 or more resource lists, thus we just iterate through them. Next we look into each resource of the current list:
        // For each resource
        for ( uint32_t r = 0; r < layout.num_active_bindings; r++ ) {
            const ResourceBinding& binding = layout.bindings[r];

            // Find resource name
            // Copy string_buffer
            char* resource_name = lookup.find_resource( (char*)binding.name );

            switch ( binding.type ) {
                case hydra::graphics::ResourceType::Constants:
                case hydra::graphics::ResourceType::Buffer:
                {
                    BufferHandle handle = resource_name ? database.find_buffer( resource_name ) : device.get_dummy_constant_buffer();
                    resources_handles[r].handle = handle.handle;

                    break;
                }

                ... same for textures
For each binding coming from the shader (think ‘albedo’ for a PBR shader) we search for the actual resource name (‘WoodBeamAlbedo’) and query the database to find it. After we did that, we can create the list:
            }
        }

        ResourceListCreation creation = { pipeline_creation.resource_list_layout[l], resources_handles, layout.num_active_bindings };
        resource_lists[l] = device.create_resource_list( creation );
    }

    num_resource_lists = pipeline_creation.num_active_layouts;
    pipeline = pipeline_handle;
}
With this mechanism we added another explicit connection between resources.
It is finally time to see the actual render pipeline!
Render Stage/Pass
This is the CORE of everything, and it must work with all both geometrical stages and post-process ones. You can either create a base virtual class or doing something like here. Important is understanding the concept!
//
// Encapsulate the rendering of anything that writes to one or more Render Targets.
//
struct RenderStage {

    enum Type {
        Geometry, Post, PostCompute, Swapchain, Count
    };

	Type                            type                                = Count;
Simply we define the types:
- Geometry - uses render manager with meshes to draw.
- Post - fullscreen triangle + shader.
- PostCompute - any compute shader execution basically!
- Swapchain - special case of binding the window framebuffer and render the last time.
Next is the most important part: dependencies!
    array( TextureHandle )          input_textures                      = nullptr;
    array( TextureHandle )          output_textures                     = nullptr;

    TextureHandle                   depth_texture;
When we create the pipeline, we save all inputs and outputs textures. Depth/Stencil is a put in its own part.
    float                           scale_x                             = 1.0f;
    float                           scale_y                             = 1.0f;
    uint16_t                        current_width                       = 1;
    uint16_t                        current_height                      = 1;
Here we handle scaling. When using scale, we use the framebuffer’s window width/height to calculate the Render Target size of the output ones. When using the current width/height we instead define a specific size (like for a shadow map).
RenderPassHandle render_pass;
hydra::graphics low level rendering needs this handle to actually handle the drawing.
    Material*                       material                            = nullptr;
    uint8_t                         pass_index                          = 0;
This is for PostProcesses : material and pass index to retrieve the ‘shader instance’ containing the pipeline and the resource lists.
RenderView* render_view = nullptr;
RenderView used by this stage. For example the ‘Sun Shadow Render Stage’ will use the ‘Shadow Render View’ to dispatch all its objects to each render manager.
    float                           clear_color[4];
    float                           clear_depth_value;
    uint8_t                         clear_stencil_value;

    uint8_t                         clear_rt                            : 1;
    uint8_t                         clear_depth                         : 1;
    uint8_t                         clear_stencil                       : 1;
    uint8_t                         resize_output                       : 1;
    uint8_t                         pad                                 : 4;
If the stage needs to clear its output(s), these will tell what to do.
uint64_t geometry_stage_mask; // Used to send render objects to the proper stage. Not used by compute or postprocess stages.
This creates a link between render managers and stages. An object is rendered only if its stage mask equals at least one stage. Why that ? Because when defining a render view, we have a list of objects visible from that camera, and we need a way of dispatching those objects to their respective managers.
For example a ‘dynamic render object’ could have appear both on the gbuffer pass and an ‘object special effect’ pass - both visible from the main camera.
This ideas comes from the AMAZING talk by Bungie:
http://advances.realtimerendering.com/destiny/gdc_2015/Tatarchuk_GDC_2015__Destiny_Renderer_web.pdf
A render manager is what they call a feature renderer - named differently because this version is much more basic!
array( RenderManager* ) render_managers;
Render Managers can register to stages even if they don’t have objects, for example a ‘Lighting Manager’ would want to submit a list of visible light in a certain pass.
    // Interface
    virtual void                    init();
    virtual void                    terminate();

    virtual void                    begin( Device& device, CommandBuffer* commands );
    virtual void                    render( Device& device, CommandBuffer* commands );
    virtual void                    end( Device& device, CommandBuffer* commands );

    virtual void                    load_resources( ShaderResourcesDatabase& db, Device& device );
    virtual void                    resize( uint16_t width, uint16_t height, Device& device );

    void                            register_render_manager( RenderManager* manager );

}; // struct RenderStage
This is the final interface. Load resources is used for PostProcesses - they have a material and need to load its resources.
Render Pipeline
We arrived at the last piece of the puzzle!
//
// A full frame of rendering using RenderStages.
//
struct RenderPipeline {

    struct StageMap {
        char*                       key;
        RenderStage*                value;
    };

    struct TextureMap {
        char*                       key;
        TextureHandle               value;
    };

    void                            init( ShaderResourcesDatabase* initial_db );
    void                            terminate( Device& device );

    void                            update();
    void                            render( Device& device, CommandBuffer* commands );

    void                            load_resources( Device& device );
    void                            resize( uint16_t width, uint16_t height, Device& device );

    StageMap*                       name_to_stage                       = nullptr;
    TextureMap*                     name_to_texture                     = nullptr;

    ShaderResourcesDatabase         resource_database;
    ShaderResourcesLookup           resource_lookup;

}; // struct RenderPipeline
This is literally IT! This class contains all the stages and resources needed to render. Most of the time it will just iterate over the stages and execute something per stage.
Resource database contains all the resources used actually - and the lookup instead is only for the PostProcess stages.
Render Pipeline Description
We really have all the part to render a frame! Let’s look at the data defining the pipeline. We will define a simple-silly-non-effective PBR deferred rendering. Probably the worst shaders you saw, but it will still work.
First we define the Render Targets:
{
    "name": "PBR_Deferred",
    "RenderTargets": [
        {
            "name": "GBufferAlbedo",
            "format": "R8G8B8A8_UNORM"
        },
        {
            "name": "GBufferNormals",
            "format": "R16G16B16A16_SNORM"
        },
        {
            "name": "GBufferProperties0",
            "format": "R8G8B8A8_UNORM"
        },
        {
            "name": "MainDepth",
            "format": "D24_UNORM_S8_UINT"
        },
        {
            "name": "BackBufferColor",
            "format": "R16G16B16A16_FLOAT"
        }
    ],
by default they will have the same size as the window framebuffer, unless otherwise written (scale_x/y, width/height).
Next are the actual render stages. The first is the GBufferOpaque one:
    "RenderStages": [
        {
            "name": "GBufferOpaque",
            "type": "Geometry",
            "render_view": "main",
            "depth_stencil": "Main",
            "inputs": [

            ],
            "outputs": {
                "rts": [ "GBufferAlbedo", "GBufferNormals", "GBufferProperties0" ],
                "depth": "MainDepth",
                "flags": "Common",
                "clear_color": "000000ff",
                "clear_depth": 1.0,
                "clear_stencil": 0
            }
        },
As you see it outputs to 3 Render Targets + Depth. It also specify clear color, depth and stencil.
Next is the silliest compute shader to calculate light:
        {
            "name": "DeferredLights",
            "type": "PostCompute",
            "material_name": "SimpleFullscreen",
            "material_pass_index": 2,
            "inputs": [
                {
                    "name": "GBufferAlbedo",
                    "sampler": "Point",
                    "binding": "gbuffer_albedo"
                },
                {
                    "name": "GBufferNormals",
                    "sampler": "Point",
                    "binding": "gbuffer_normals"
                },
                {
                    "name": "GBufferProperties0",
                    "sampler": "Point",
                    "binding": "gbuffer_properties0"
                },
                {
                    "name": "MainDepth",
                    "sampler": "Point",
                    "binding": "depth_texture"
                }
            ],
            "outputs": {
                "images": [
                    {
                        "name": "BackBufferColor",
                        "binding": "destination_texture"
                    }
                ],
                "flags": "Common"
            }
        },
It will read all the previously generated textures and run a compute shader to calculate the final lighting. Worth noting ‘material’ and ‘material pass index’ - to retrieve the shader from the material. If you open SimpleFullscreen.hfx and go to the third defined pass, you will see the code.
Next is an example of reusing a Render Target to add informations (like transparent objects). It will add debug rendering on top of the other objects and write in the BackBufferColor render target. The absence of clear parameters dictates that we don’t want to clear.
        {
            "name": "DebugRendering",
            "type": "Geometry",
            "render_view": "main",
            "inputs": [

            ],
            "outputs": {
                "rts": [ "BackBufferColor" ],
                "depth": "MainDepth",
                "flags": "Common"
            }
        },
Last step is the swapchain. It is simply using a simple shader to write to the window framebuffer as the last step of the frame.
        {
            "name": "Swapchain",
            "type": "Swapchain",
            "mask": "FRAMEBUFFER",
            "material_name": "Swapchain",
            "render_view": "",
            "depth_stencil": "Post",
            "inputs": [
                {
                    "name": "BackBufferColor",
                    "sampler": "Point",
                    "binding": "input_texture"
                }
            ],
            "outputs": {
                "rts": [
                ],
                "depth": "",
                "flags": "Common",
                "clear_color": "000000ff"
            }
        }
    ]
}
Visualization
With all this defined, we can arrive to have something incredibly useful as this (included in the demo!):
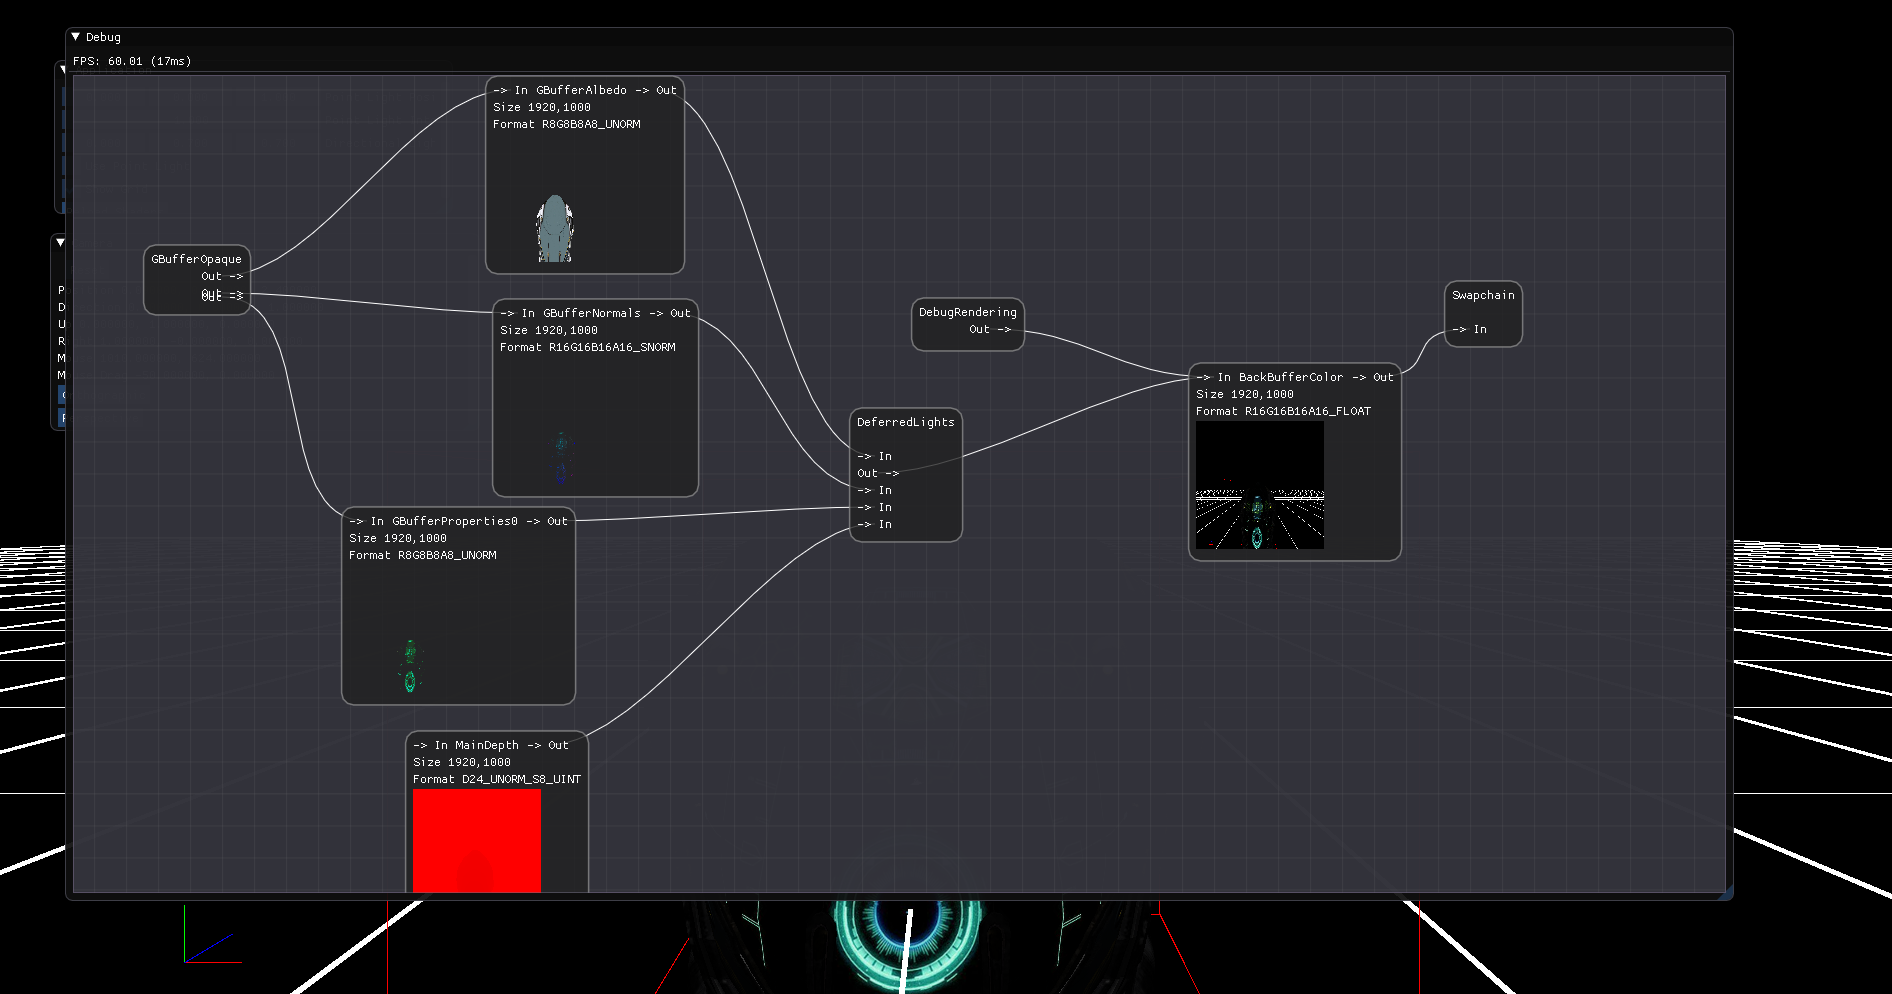
Render Pipeline
To me this is the quintessence of rendering: visualization. Seeing things helps me understanding much better. Debugging broken features, studying features, understanding dependencies, shuffling things around becomes MUCH easier.
Demo and code
The demo loads a model, apply a silly directional light and gives you some controls, and uses the render pipeline. It was setup during the night just to show something usable, but it is far from ideal!
In the code provided there is everything I am talking here.
And now some links to libraries/resources used.
3 models are included from the free GLTF library: https://github.com/KhronosGroup/glTF-Sample-Models
TinyGLTF by Syoyo Fujita:
https://github.com/syoyo/tinygltf
The always present-always amazing ImGui by Omar: https://github.com/ocornut/imgui
With the NodeEditor by Michał Cichoń: https://github.com/thedmd/imgui-node-editor
For the PBR rendering, kudos to the GREAT INFORMATIONS from Google Filament and Romain Guy.
Lastly, this is not anywhere near production ready, but I am still happy to share it as a knowledge building block for others. I am thinking of making some videos for this - if you are interested let me know (both in English and Italian).
Conclusions
We arrived at defining the Render Pipeline - a way of describing how a frame is rendered. It is a very simplified version of the RenderGraph/FrameGraph - as seen in many talks - and this is something I’ve used in my home projects (and current indie game) with great success. No mention of adding resource barriers, sharing memory, async compute and more. The whole purpose of this article was instead to focus on the more high level architecture side.
What is next ?
I would write about the improvements on the HFX shader effect and would like to cleanup and make that library more robust. Then there is the Vulkan backend to be wrote and many examples to be done. Examples could be amazing to be tutorial and develop the technology more. Then there is talking deeper about dispatching rendering draws, render managers and such - another interesting and very unique subject in Rendering Engine architectures. In all the companies I’ve worked, I always found completely different solutions!
Please comment, share, send feedback! I am happy to answer any question and very happy to share this article. Thanks for reading!
Gabriel